Sunday, July 29, 2012

Parmesan Roasted Zucchini Fries


Zucchini is one of my favorite vegetables. I find the flavor to be so versatile - all it needs is a little salt, pepper, and olive oil to make a simple savory side dish.
Usually, I slice my zucchini into medallions and saute them until golden brown. Simple, tasty and healthy! However, I was introduced to an entirely new way of eating zucchini when I tried Red Robin's decadent zucchini fries. Crispy thick zucchini pieces deep fried until the outside is crunchy and the inside is light and juicy.
I'll skip over my repeated woes about how I don't have a deep fryer and head right into how roasting your zucchini fries can give an excellent flavor without all the fat.
I know, I know, you're going to accuse me of lying, because roasting zucchini could in no way rival deep frying them in oily goodness. But trust me on this one. There are two important rules of life:
1. You don't need all that oil
2. Cheese fixes everything

So, without further ado, grab the following ingredients

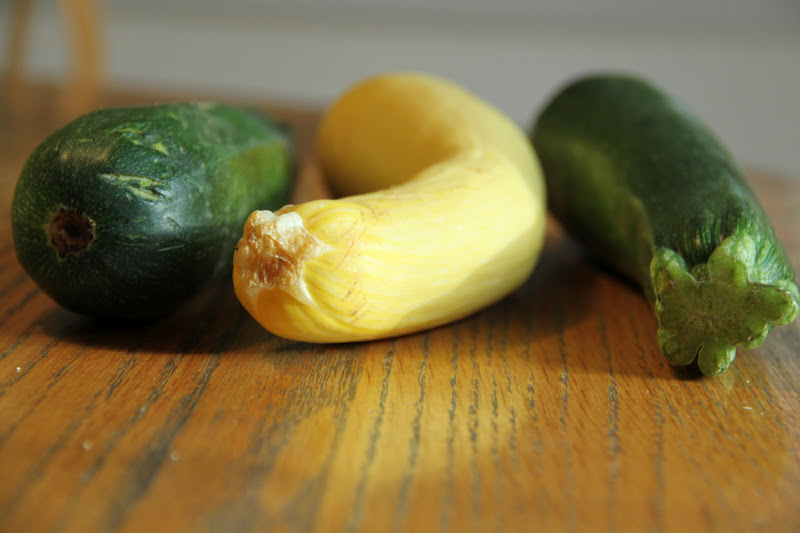
2-3 zucchinis (I used one zucchini and one yellow squash for the color variety)
1/4 teaspoon salt
1/4 teaspoon freshly ground black pepper
1/2 cup flour
3 eggs, beaten
1 1/2 cups breadcrumbs
3/4 cup grated parmesan cheese

Preheat your oven to 450 degrees F.

First, slice your zucchini up into thick steak fry shapes. I generally cut each one in half, then quarter both halves. Thicker fries taste better!


Next, grab three shallow dishes. Place your flour, salt and pepper in one, your beaten eggs in another, and your cheese and breadcrumbs in the third.


Then, liberally coat a baking sheet in olive oil.


Grab your first zucchini piece, then dip it in the flour, egg, and breadcrumb-cheese mixture. Make sure each piece is liberally coated in egg and breadcrumbs.


Place your fry-in-the-making onto the baking sheet.


Do the same thing with all of the remaining zucchini pieces until they're all breaded and neatly lined up.


Place your baking sheet in the oven for 10 minutes. Then, carefully (I recommend using tongs) flip your fries over and bake for an additional 8 minutes until browned and crispy.


Select your dipping sauce (or eat them plain, like me!) and enjoy. Feel free to top with additional grated parmesan! Remember, cheese fixes everything.


Follow Me on Pinterest

Friday, July 27, 2012

What Crepe?

There's a restaurant in Royal Oak that my mom has been talking about for months. Located on South Washington Avenue, this restaurant is a dainty little joint called What Crepe?, and today, my mom invited me there to lunch.


You see, my mom spent several months in France when she was a teenager, so she has a bit of a thing for European food. Particularly,  crepes. Now, I'm a huge crepe fan myself, but I typically go with the old nutella-and-banana standby when I wake up late on a lazy Sunday morning and want something sweet. This place, however, makes everything in a crepe.

Literally. Everything.

Their decor is an echo of an earlier European decade.


 Even the plates were dainty and French!

This place has about three different menus - one for drinks, one for specials, and one for regular food. Their regular menu is even further divided into sweet crepes, savory crepes, favorite crepes, and build-your-own crepes.


 I find that if a dish is on the specials menu, that usually means its pretty good. So, I chose their special Thai chicken crepe with a tall glass of iced tea.


Mom went for a traditional eggs, ham, cheese, and asparagus crepe.


Let me explain this clearly - these were easily the silkiest, butteryest, and most delicious crepes that I've ever tasted.
My mom agreed, and, remember, she's lived in France, so she knows what she's talking about.
I was also impressed with their ability to blend flavors. After all, one doesn't normally think of Thai food and crepes going well together, but the savory buttery pancake was a perfect housing for the typical spicy Asian stir-fry.

Given my inability to eat any crepe without having a nutella-filled one, my mom and I decided it was absolutely necessary that we order a sweet crepe for dessert. This time, instead of ordering off of the ready-made menu, we decided to make our own.

Our creation: nutella, chocolate sauce, caramelized bananas, marshmallow, and graham cracker crust.


Words cannot even describe. 

 Needless to say, I recommend this restaurant to anyone in the metro-Detroit area who wants to take a stab at trying some crepe masterpieces. It's also a great spot to pop into for a gourmet dessert! (I recommend building your own. You literally cannot go wrong with any combination that you pick.)

Now, I must go find some ingredients to make my own.....

Arvoir!


Follow Me on Pinterest

Wednesday, July 25, 2012

Supremely Crispy Baked Sweet Potato Fries

Since the whole world seems to be on a health kick, most restaurants seem to be offering sweet potato fries as an alternative to regular idaho potato fries. While the idea seems to be that sweet potato fries are more nutritious, I know many people (myself included) who adore the taste of them much more than regular fries.

Unfortunately, one reason that I love the taste so much is the crispy crunchy coating that the fries have, adding a salty kick to the (in my opinion) overly-sweet potato flesh. And that coating is hard to recreate in your home if you don't happen to have a deep-fryer lying around.

In my attempts to remain under 300 lbs, I have refrained form purchasing a deep fryer, and, like most people, opt to bake my sweet potato fries. Much to my disappointment, baked sweet potato fries often come out mushy, limp, and anything but crispy. Through multiple trial-and-error processes, I've come up with a simple 3-step process to ensure your time and effort will reap the benefits of crispy baked sweet potato fries.


You will need:
1 Large sweet potato
1 egg
1 Tablespoon cornstarch
Salt

Start by preheating your oven to 450 degrees F and chopping your potato into thin strips.


Next, grab a large plastic bag. Using an egg separator (or your hands), break the egg over the bag allowing the whites to drip down into it.


DOUBLE YOLK!! (such a shame since I had to throw it out...)

At this point, I'd also like to note that my friend Maria was the "guest photographer" today during the shoot of this recipe. It certainly saved me time, and she couldn't stop snapping pics. I think I know what to get her for her birthday this year....a camera!

Next, place your potato strips into the bag, zip it up, and shake it around, allowing the egg white to coat the fries.


Next, add your cornstarch to the bag, zip it up, and shake again.


Spread them out evenly onto a non-stick baking pan, leaving as much room between each fry as possible.


Then pop your fries into the oven for 10 minutes.


After the 10 minutes, take the pan out and flip your fries.
Now, I warn you, the egg whites will cook quickly, so they will be difficult to flip (that's what the non-stick was for). But I promise it's worth it, because the same thing causing the flipping difficulty (the egg whites) are also causing the fries to crisp.

Leave your fries in for another 5-10 minutes until golden brown and crispy. When you're done, scoop them off of the pan and into a bowl.


I recommend dipping them in spicy mayo dip - find the recipe here.

Follow Me on Pinterest

Sunday, July 22, 2012

Aesthetically Pleasing Chocolate Chip Cookies


We all know the drill when it comes to chocolate chip cookies - grab  a bag of Nestle Toll House Semi-Sweet chips, follow the recipe on the back, end up with a deliciously chocolatey runny dough, spoon it onto a cookie sheet, and watch as your beautiful cookies flatten into pancakes buttoned with mountains of chocolate chips.

Photo from Jackie Ruins the Cake blog

We all know the drill when it comes to chocolate chip cookies - grab  a bag of Nestle Toll House Semi-Sweet chips, follow the recipe on the back, end up with a deliciously chocolatey runny dough, spoon it onto a cookie sheet, and watch as your beautiful cookies flatten into pancakes buttoned with mountains of chocolate chips.

Yes, I too have entered into this ritualistic relationship with chocolate chip cookies. And no matter how much I give, the cookies always seem to morph from promising dough balls into timid crackers of sugar and chocolate.

To release yourself from this cycle of disappointment and create beautiful voluminous cookies, I recommend slight additions of sugar and flour. Specifically, use:

2 sticks butter, softened
3/4 cup packed light brown sugar
1 cup granulated sugar
2 eggs
1 Tablespoon vanilla
3 1/2 cups flour
1 teaspoon salt
1 teaspoon baking soda

Follow the usual agenda, creaming butter and sugars, adding eggs, then the dry ingredients.

Additionally, for a more full-bodied flavor (and because I'm still shunning semi-sweet chips for their unreliable recipe), I use 8 oz of milk chocolate chips and 8 oz of dark chocolate chips.


Fold your two sets of chips into the batter gently, then scoop out into 1-inch balls and bake all at 350 degrees F for 15-20 minutes.

When you pull your cookies out of the oven, you'll be happy to see plump, chewy, moist cookies rather than crispy flat pancakes.


*Dough recipe adapted from Picky Palate's Oreo Stuffed Chocolate Chip Cookies

Follow Me on Pinterest

Monday, July 16, 2012

Lightened-Up Bang Bang Shrimp Salad

Many of you may have seen my previous restaurant post about Bonefish Grill (if you haven't check it out here!). If you have, or if you've ever ventured to one yourself, you probably know that patrons go nuts over their signature Bang Bang Shrimp. If you don't believe me, check out the line on $5 Bang Bang Shrimp Wednesdays.
I had the pleasure of tasting the delicious appetizer during my last visit, and now I'm hooked. The shrimp was tangy, sweet, gooey, and crunchy all at the same time, a glorious feat of culinary mastery. And although I could sense that the sauce contained gratuitous amounts of mayonnaise and the shrimp was surely deep fried, I couldn't have cared less! I ate all the shrimp I could, and when they were all gone, I proceeded to nibble on the bed of lettuce and cabbage that the shrimp had been sitting on. I was pleased to find that the warm Bang Bang sauce had seeped down past the hot shrimp and coated the lettuce, creating a unique and tangy dressing.
Several weeks later, the idea hit me - if Bang Bang sauce made such a great dressing before, surely it would be an excellent addition to a salad!
And from that idea, I present to you my lightened-up version of Bang Bang shrimp topping a fresh and healthy salad.


My recipe used a sauce almost identical to the restaurant's, but includes pan-frying the shrimp instead of deep-frying them. If you're pressed for time or want to cut down on excess oil even more, feel free to bake the shrimp in the oven!

So, if you're ready to try this tangy, fresh, and oh-so-addictive salad yourself, grab these ingredients:

1 lb uncooked shrimp
1 head iceberg lettuce
1 package broccoli slaw
1/3 cup chopped green onions
2 cups Panko bread crumbs
Oil
3/4 cup mayonnaise
3/8 cup Thai Sweet Chili Sauce
1 teaspoon Sriracha

Ready? Let's go.

Start by washing, peeling, and deveining all of your little shrimp.


I know this part can be gross, but really, would you rather risk eating feces?

Once your shrimp are all cleaned, inside and out, cover them and place them in the fridge.


Next, gather all of your greens.


Start by chopping up the entire head of lettuce into strips, making sure to remove the yellow leaves (you don't want your salad to be bitter!).


Place all of your lettuce into a large serving bowl. Top with the broccoli slaw mixture, then chop your green onions and sprinkle them onto the very top.


Next, you'll make your Bang Bang sauce. BEHOLD - the three greatest ingredients that I've never expected to use together:


Side note: the Thai Sweet Chili Sauce (center) was fairly difficult to find, so don't get it mixed up with Thai Chili Oil, or any other chili condiments that don't include the word 'sweet' in the title. Sweetness is the key to this recipe!

Mix your mayo, chili sauce, and Sriracha together in a small bowl until smooth and creamy.


Next, gab a large frying pan, add 2 tablespoons of oil, and heat on medium.


Place your Panko crumbs into a shallow dish or pan and toss your shrimp in 1-2 tablespoons of oil.


Dredge your shrimp in the Panko crumbs, tossing to coat.


Carefully remove each one (I recommend using tongs for this part) and place them onto the hot pan. Allow the shrimp to cook about 3 minutes on each side, or until the breading is browned and the shrimp are no longer translucent (they should have a nice pink color to them).


Next, stack your shrimp in a bowl and pour the Bang Bang sauce all over them, tossing well to coat evenly. 


Scoop yourself (and everyone else, if you're willing to share) a heaping bowl of the salad mixture and top with generous amounts of the hot shrimp and sauce.


And there you go! No need to muscle past patrons on Bang Bang Wednesdays anymore, you've got the means to make your own at home (and impress your friends).


Follow Me on Pinterest