Showing posts with label DIY. Show all posts

Thursday, January 31, 2013

Make-Your-Own Oat Bars

I've been struggling for awhile with finding a way to make my own protein/oat/granola/breakfast bars. 
I know at this day in age, it's easy to go to the store and buy a box from any number of major brands, but I'm more of a DIY kind of girl when it comes to food. 
I started experimenting with different ideas, looking through other blogger's and chef's recipes for staple ingredients. Cut out the fancy stuff, look for the bare essentials, and develop a formula for making any kind of simple oat-based bars quickly and easily, with room for your own customization.
I think I've got it.


The key here, like I said, is customization, so my recipe is less of a recipe and more of guidelines to develop your own uniquely flavored bars.

Step 1: Pick 2 1/2 cups of any basic grain. I went with oatmeal, easy and reliable.


Step 2: Pick 1 cup of your favorite dried fruit. Dried cranberrys, craisins, apricots, blueberries, cherrys, whatever you feel. You can also combine 1/2 cup berries with 1/2 cup of your favorite nuts if you're looking for more protein. Peanuts, pistachios, sunflower seeds, and almonds all work well with this recipe.

I went with dried cranberries


Step 3: Get a can of low-fat sweetened condensed milk. This is your binding agent.

Start by placing your grains onto a parchment-lined baking sheet. Cook at 350 degrees F for 12 minutes until golden and crispy, stirring around halfway through baking time.


Meanwhile, heat 14 oz of sweetened condensed milk in a saucepan over medium heat, constantly stirring. When the mixture is thin, it's ready.


Grab two corners of the parchment paper and funnel your oats into the saucepan. Add your 8 oz dried berries and/or nuts. Stir to combine.


Place the parchment paper back on the baking sheet. Pour your mixture onto the parchment paper and flatten it out into a rectangle. Lower the heat to 300 degrees F and cook for 20-30 minutes.


Allow to cool for 2-3 hours before cutting into bars. When you're done, you have your sweet and crunchy homemade creation.


Follow Me on Pinterest

Sunday, September 30, 2012

Smashburger

Since my last post was a re-creation of the rosemary and olive oil fries served at Smashburger (my all-time favorite chain burger joint), I figured I should pay homage to the original creator.
Smashburger is a fun fresh restaurant that's popping up in random cities across America. Unfortunately, there's none within a 30-mile radius of my location, so I have to travel a ways to get my hands on the deliciousness. Fear not, like all great loves, this restaurant is worth going the distance for.
So, this weekend, I trekked across our fair state to go to Smashburger visit my boyfriend in Kalamazoo, where the lucky inhabitants have access to a Smashburger. Of course, we had to go there at least once to grab a burger. (psst - I went twice)


For those of you unlucky enough to have never been here before, let me break it down for you:

The menu is divided into smashburgers, smashchicken, salads, hot dogs, and sides. If you're going for a burger, you can choose a preset recipe or a build-your-own option. They also come in three different sizes -
 small, regular, and large.
You walk up to the counter, joyously place your order, and, of course, add on a side of smashfries. Then they hand you a number and bring it to your table.


I opted for the build-your-own smashburger option - it's only $4.29 for a regular-sized burger, and most basic toppings and sauces are free.


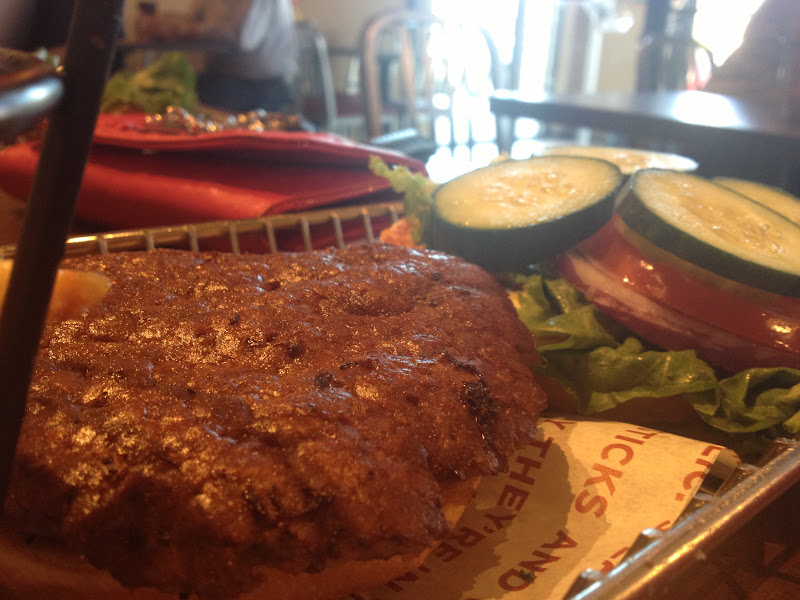
When the burger tray arrives at your table, you'll be in awe of its beauty.


Fresh beef 'smashed' together with my generous plethora of toppings - pickles, tomatoes, red onions, cucumbers, lettuce, mustard, ketchup, and smashsauce - all held together by a buttery egg bun.


Let me warn you - they're generous with the toppings here. Which means your hands will likely be covered in whatever sauce you put on your burger after the third bite. Dress appropriately, or wear a bib.

And don't let me forget the olive oil and rosemary french fries that I'm so giddy about.


Simply delicious.

The boyfriend opted for a more tame burger than mine - cheese, ketchup, mustard, and smashsauce. 


Is it just me, or does it look like he got more fries than me??
Perhaps I just ate mine too quickly to tell.


If you're looking for a smashburger in your area, they have a great directory here.

Follow Me on Pinterest

Friday, September 14, 2012

Spicy Kale Chips

Now that Katie is off in England studying abroad for the year, I'm going through withdrawals.
My solution? Continuously making a new recipe that she taught me.

Katie is a notorious health nut, always coming back from markets with bags upon bags of leafy green vegetables and tofu noodles. Whenever I ask her what she's going to make with all of them, she has a list of recipes for even the most obscure veggies.
Recently, when she and I went to the farmer's market, we both grabbed a bag stuffed to the brim with thick leafy kale. A bit of a stranger to kale myself, I followed her lead so that I could make one of her snack favorites - kale chips!


Thin, crispy, and incredibly low-calorie, these healthy "chips" will substitute for the usual fattening potato chip or butter-laden popcorn. I like to make a batch of these while I'm sitting in front of the TV so that I can snack guilt-free!
Katie's recipe is fairly plain, so I added a little spicy kick of my own.

To make these spicy chips, you'll need:
1-2 leafs of kale
olive oil
1/2 teaspoon salt
1/4 teaspoon pepper

1/4 teaspoon Weber Kickin Chicken seasoning

First, preheat the oven to 250 degrees F. Then, wash and dry your kale.


Next, tear your kale up into half dollar-sized pieces. Try to grab the leafy edges, not the areas close to the stem.


Then, line a baking sheet with your kale pieces.


Drizzle olive oil over your kale..

Then sprinkle the leaves with salt, pepper and your spicy seasoning.


Pop these soon-to-be-crispy pieces into the oven for 30 minutes.
When they're done, carefully pick them up off the pan and pile them into your usual popcorn bowl. Be gentle - they're super delicate!


Feel free to eat as many bowls of these little snacks as you'd like. They're practically calorie-free and loaded with flavor!


Follow Me on Pinterest

Friday, August 31, 2012

The Economics of Good Coffee


Some of you may be a bit confused by the title of this post. What are the "economics" of good coffee? Why not the "art" of good coffee?
Well, for one, I'm not a professionally trained barista with enough knowledge to tell you the art of good coffee, so I'm not going to pretend to do so and give you incorrect information (that would just be mean). And two, I am a business student, so I know a bit about math and money, which is what I'm going to focus on here.

Drinking coffee is a habit that numerous people all over the world have developed. While it's more prevalent in some nations than others, it's fairly safe to say that the whole world has a bit of a love affair with the tiny bitter beans.

I myself have a huge coffee addiction, which you probably figured out since my name is The Coffee Breaker!
My addiction is less about the caffeine, however, and more about the feeling that I get from drinking a huge mug of smooth and delicious coffee. Whenever I'm settling down to get some work done, starting a new novel or relaxing with friends, nothing fits better than a cup of coffee. What can I say, it's my comfort food!

If you suffer from a coffee addiction like me, caffeine or comfort-food induced, you may just grab one of these every day.

But that gets expensive after awhile. Which is why most people I know have taken to purchasing their own coffee and roasting it at home. Unfortunately, to save money, many people have settled for buying less-than-excellent canned coffees over fresh-roasted beans from their local cafe. And while the canned brands may give you more coffee grounds for your $$, you end up using twice as much coffee to get the same amount of flavor from fresh beans.

For example, let's take a bag of Starbucks Coffee.


You can get this 1 lb bag of beans for $11.95

1 lb / 2 tablespoons per 6 oz of Starbucks blend = 16 cups of delicious coffee


Now I'm going to pick on Maxwell House brand, because I've had some thoroughly horrifying experiences with this coffee. In my opinion, it produces a thoroughly stale and unnatural cup of java.


You can grab this 31.5 oz can of Maxwell House coffee (1.97 lbs) for $11.84 and think that you just got a great bargain. After all, you just got twice as much coffee as the Starbucks blend for the same price, right?Unfortunately, with canned coffees, you often have to use twice as much of the grounds to produce the same flavor as freshly ground beans.

So, 1.97 lbs / 4 tablespoons of Maxwell House = 15.76 cups of "somewhat okay" coffee.

Therefore, buying the fresher beans gives you better coffee and more of it when you get down to the math. 

Okay, sorry about that little economical rant I just did. I promise, I'll control myself better for the rest of this post.
Anyways, besides purchasing your own beans and roasting them at home, there's numerous other ways to make your own little cafe in your kitchen. One option is grinding your own beans.


Freshly ground coffee provides a lot more flavor. If you want a simple grinder, go for this Krups model.


Reliable and economical (around $20 at your local Bed Bath and Beyond, or available here).

If your find yourself purchasing a lot of lattes and cappuccinos, pick yourself up a simple milk frother. I got this model from Sur La Table for $12.
If you want to make truly professional cappuccinos and lattes, this Nespresso frother really can't be beat.


This frother (and a steady hand) allows your to make cappuccinos like this:


You can order one online here.


And if you really want to make your own Starbucks-style caramel macchiatos, cinnamon dolce lattes, etc., spring for a few bottles of Torani flavored syrup.


Play with flavor combinations to make your own specialty coffees. I like sprinkling a dash of the caramel syrup into my black coffee every now and then. It's my own lighter version of a caramel latte. The full six-pack is available here.

Like I said, the love affair between coffee and us humans isn't going to end anytime soon. So if you want to feed your addiction without dropping hundreds of dollars on frappuccinos and lattes every week, invest in some simple home goods to build up your very own mini-cafe.

Enjoy!
xx


Follow Me on Pinterest

Monday, August 27, 2012

Crumbly S'more Bars

I've always been a sucker for s'mores. 
Unfortunately, being a summer treat, I can really only eat them during the June-August season. Making them in the microwave or the toaster oven is never as good as the fire-scalded marshmallows shoved between two graham crackers as you try to balance the roasting stick flavor that just drips out of a woodland summer s'more. 
Fortunately, there are ways around that little problem.


These Crumbly S'more Bars take a childhood classic and dress them up for an indoor adult world scene. Using the same ingredients as a basic s'more, plus a little bit of butter, you can have your own ooey-gooey summer treat during any season.

You will need:

9 sheets of graham crackers, plus one
1/2 stick of butter, melted
1 cup chocolate chips, plus 1/2 cup melted
1 3/4 cup mini marshmallows

Preheat your oven to 375 degrees F.

Start by grabbing your graham crackers and mashing the first nine sheets into a fine powder. If you have a food processor, they help a lot with this step. If not, shove them in a bag and grab a rolling pin!


Pour your graham crackers into an 8x8 pan and add your melted butter. Using a fork, press the butter into the graham crackers pieces to form a wet crust.


Place your pan in the oven and bake for 7 minutes.

Next, grab your chips. Be sure they're milk chocolate and not semi-sweet! We have to remain faithful to the original s'more recipe!


When your crust is done, top it with 1 cup of chips. Bake for 2 minutes.


Next, add your marshmallows and bake for 3 minutes. They should puff up like little mini pillows.


Take your 1/2 cup of melted chips and drizzle across the top. Be creative here and experiment with funky patterns. The chocolate is your brush, and the dessert is your canvas!


Finally, take your last sheet of graham cracker, and crumble it up in your hand. Sprinkle the crumbs across the entire dessert.


I recommend waiting at least an hour to cut these if you want to serve them in neatly cut bars (the marshmallows need time to harden). However, they're ridiculously yummy when they come straight out of the oven, so feel free to cut off a chunk and enjoy the buttery chocolatey goodness.


Follow Me on Pinterest