Showing posts with label Cookies. Show all posts

Friday, July 11, 2014

The Best Mocha Brownies

Hello everyone!

It's summertime, which means as the heat ramps up, the food cools down. As families and friends gather to grill up some hot dogs and hamburgers, these main dishes are generally served with a crisp salad, juicy fruit, and a chilled dessert to combat the summer heat wave. Which means that during my family's Fourth of July barbecue, I needed to bring out the big guns.

I made the BEST Mocha Brownies EVER.


Now I know what you're thinking - are these really the best?

Yes. 

The answer to your question is yes. 

The base is made of simple boxed brownie mix which is topped with a rich and fluffy mocha and Oreo mousse blend. The brownie is then finished off by a quick piping of whipped topping, which really ties the light and cool theme together. An absolute MUST if you're a coffee-lover looking to enjoy your favorite flavor in chilled dessert form.

If you're feeling a bit skeptical, I guess you'll just have to make some for yourself to try. It takes a few rounds of work to assemble, but it uses fairly basic ingredients that can be picked up on a quick trip to your neighborhood supermarket. Trust me, one bite of these and you're never going back to regular brownies again (and you'll be the star of any summer party if you bring these along with you!).

To make these brownies, you will need:

1 package brownie mix, plus ingredients to make cake-like brownies (eggs, water, oil)
1 cup milk
1/4 cup instant coffee granules
16 oz frozen whipped topping, thawed and divided into halves
2 packages Jell-O cheesecake flavored instant pudding
20 Oreos

Start off by pre-heating your oven to 350 degrees and greasing a 9x13 pan.


Begin by assembling your brownie base. As mentioned in the instructions, it's important to choose a boxed brownie that has the option to cook cake-like brownies. Usually, this means adding an extra egg to your batter, but each boxed mix is different.


Follow the instructions on the box and stir your ingredients together. Scoop them into your pan and place them in the oven to cook for as long as your package says.


This next step takes some patience on your part - when the brownie base has finished cooking, remove the pan and set it somewhere to cool completely before moving on to the mousse step. Otherwise, the whipped topping will melt into a soupy mess. This usually takes about 2 hours, but if you're in a hurry you can place the partially cooled pan into the fridge for the second hour to speed up the cooling time.

When your brownie base is ready, it's time to begin assembling your mousse. Start by mixing your instant coffee and milk in a large bowl until all the granules are dissolved. Then, add your cheesecake pudding mix.


Next, stir in 8 oz of the thawed whipped topping until fully combined into a light and creamy coffee mousse.


Now it's time to add the Oreos. If you have a food processor, you can blend them up into roughly chopped 1/2-inch crumbles. If you don't, place your cookies in a bag and crush them into pieces with a rolling pin.


Add these cookie pieces to your mousse and fold to combine. Then spoon the mousse onto your brownie and spread this heavenly layer across the surface. Be sure to lick the spatula after you're done - there's no use wasting any!


Next comes the additional whipped topping. If you're feeling fancy, you can use a cake decorator attachment for frosting to pipe your topping in fancy lines. If not, you can always use the eloquent and foolproof put-it-in-a-bag-and-cut-the-corner method.


Using whatever method you've chosen, pipe the whipped topping in diagonal lines across your brownies. Switch sides and pipe another set of diagonal lines going in the opposite direction, creating a diamond lattice pattern. Finish by piping a ring of whipped topping around the whole dish, covering up any stray ends.


Take a moment to admire the beauty of your coffee-cookie mousse...


...before digging in and cutting yourself a hefty slice.


Cool and creamy, infused with chocolate and mocha. Is there really anything else you need in life?

Follow Me on Pinterest

Friday, August 10, 2012

A College Kitchen

As August rips through what's left of this measly little summer, parents and students alike are scouring through Staples, Miejer, and Forever 21 to gather up everything they need for the back-to-school season.

One of my friends who happens to be heading off for his first year of college tweeted me this the other day:


Not allowed to bring a coffeemaker to school so taking a tea kettle and aeropress. Thoughts/comments/recommendations?!

(Let me get past my incredulity over the fact that this friend happens to be going to an IVY LEAGUE school, and they're not allowing coffee makers... How is he going to live?!)
This tweet brought up an important topic that I thought I should cover: what type of cooking/kitchen equipment students should bring with them to college? 
Whether you're heading to your first apartment or dorming it up for a year, many students don't have experience cooking and are confused about what to bring for their first year. As a junior whose gone through the dorm stage and apartment stage, here's my (mostly) $25 or less shopping list for new student cooks on a budget.
First, the dorm essentials:


If your college housing department is cool with students bringing coffee makers to school, I recommend this one by Cuisinart. It's worked wonders, has a timer, and makes some great coffee. This model was around $50, but smaller 4-cup versions can be purchased for less. Don't forget to check out Home Goods, TJ Maxx, Sam's Club, and Costco for excellent deals on appliances like these. You can also order it here

If you're not allowed a full-on coffee maker, or if you like your cup of joe a little stronger than most, I recommend this electric Moka pot. Just fill the inside with water, add a scoop of coffee to the screen, and press the on switch for rich and decadent espresso. You can dilute it with more hot water to give you a nice strong cup of coffee without the hassle of a big maker. This model is on Amazon for around $50 here , but cheaper on Ebay.

For tea fans, or people who only drink coffee occasionally, go to the grocery store and grab a sunbeam water boiler for around $18-$20, or order one here. These things boil up hot water in a flash for cups of tea, instant coffee, or, my personal favorite usage, to add water to your cup of instant Ramen noodles. These are an excellent investment for students living in cramped spaces, because a lot of college food (instant oatmeal, cups of noodles, easy mac, etc.) just require some hot water and a spoon to make a quick meal. Trust me, when it's 8 am and you have 10 minutes to get to class, grabbing a cup of oatmeal is much easier than hiking down to the dining hall.

If you're moving into an apartment and you're on a budget:


If you're a first-time cook and need a do-all cook-all cheap option, go with a cast iron skillet. These things are more durable than you could imagine, work on the top of a stove or in the oven, and actually get better as they load up with grease and seasonings. Perfect for frying up some chicken, vegetable stir-frys, and eggs. The best part about cast-iron skillet? It's CHEAP. You can grab one by Lodge for just $10 online here. Just be careful not to wash it with soap and water! Excellent cleaning instructions can be found here.


Once you've got your pan, you'll need something to move the food with as you cook. Invest in a nice pair of tongs as your all-purpose flipping, stirring, tossing and grabbing utensil. I recommend grabbing one like this that comes with the no-heat rubber grips on the sides so you don't accidentally burn your hands. Find one for cheap here.

Despite how much I love tongs, there are a few small things that they can't do, one of which is flip an egg over easy. For that, you'll need a more traditional spatula, like these. This batch of colorful spatulas can be picked up at Target for $18.59 (you can also buy them separately if you don't want all four). Find an even cheaper version online here.
If you're going to be cooking, you're going to be chopping, so invest in one or two nice knives. I got by my first year in an apartment with these two paring knives by Rada. For just $5-$6 each, these knives are durable and reliant, meaning they actually cut well, unlike most bargain knives you pick up at Meijer or Kroger. You can order a few off of Amazon here.

Additionally, you'll want a small baking sheet for toasting pizza rolls, baking cookies and making Crispy Sweet Potato Fries. Fine one here.

Another essential item for the new college cook is a small saucepan for soups, boiling frozen vegetables, and heating up jars of pasta sauce (trust me, you'll be eating a lot of pasta). This little Cuisinart pot is fantastic, and comes with a lifetime guarantee, so you'll never have to worry about it breaking down on you. The company sells it for a slightly higher prices, but websites like Zappos and Amazon price it at $20 here. You can also find these at Home Goods and TJ Maxx for a bargain if you don't want to pay the shipping fees.

My last essential that I'll recommend is this set of Pyrex bowls and lids. I've used these as mixing bowls for cookie dough and as a storage place for leftovers. By far my favorite use for these, however, is pre-making meals for the week. Every Sunday, I'll go to the grocery store and grab ingredients to make a humongous salad and dressing. I'll pile the whole salad into the 4 qt bowl and stick it in the fridge, so that every morning I can scoop out some salad, put it in one of the smaller bowls, and take it on campus with me for lunch. It certainly makes your morning routine a lot less stressful! You can buy this pack at Target for just $20, or order it online here.

For the more adventurous shopper, I'll give you my list of non-essentials that are certainly worth the extra investment if you really want to get into cooking:


A toaster, while not essential to life, is certainly a nice thing to have in the morning. Most are pretty cheap, around $12-$20 at Target, Meijer, or Bed Bath and Beyond. If stores are getting cleared out, there's plenty to order online, like this one.
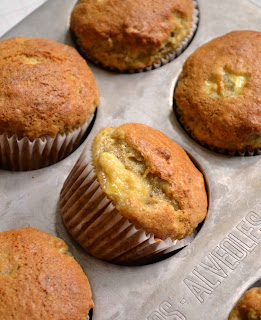
A small muffin tin is certainly helpful for several reasons: 1. I would always use mine to make banana bread muffins out of the leftover browning bananas I bought for the week but never ate.


Trust me, these come in handy as great snacks and are a great way to get some use out of your old bananas. My 2nd reason for getting this muffin tin speaks for itself:


Just bake some eggs in a muffin tin on a Sunday night, then pop one, two or three in the microwave every morning for a quick and filling breakfast. Grab one for cheap here.

A small George Foreman grill is also an excellent investment for the budding college cook. Hamburgers, turkey burgers, grilled chicken, paninis...the possibilities with this thing are endless and delicious. Super easy to use, and only $17.99 at Target or $18.99 online here.
Lastly, for the people who pack their schedules to the brim and barely have time to cook, I recommend buying a small Crock Pot. Just pop your food in before you leave for class, let it simmer for 4-8 hours, and when you come back from your exam starving and exhausted, a delicious meal will be waiting for you. This model and the one that I have are available at Target for just $16 (so long as the sale lasts!) and are well-worth the investment. If the sale runs out, you can find one online for cheap here.

Well, there you have it. That's my short and simple list of cookware for new college students that got me through two years of college and counting. If you have any suggestions to add to my list, leave them in the comment section below!


Follow Me on Pinterest

Sunday, July 22, 2012

Aesthetically Pleasing Chocolate Chip Cookies


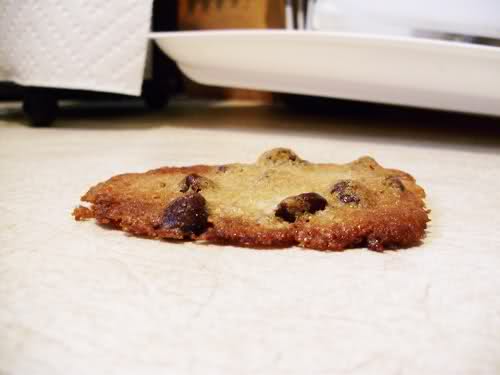
We all know the drill when it comes to chocolate chip cookies - grab  a bag of Nestle Toll House Semi-Sweet chips, follow the recipe on the back, end up with a deliciously chocolatey runny dough, spoon it onto a cookie sheet, and watch as your beautiful cookies flatten into pancakes buttoned with mountains of chocolate chips.

Photo from Jackie Ruins the Cake blog

We all know the drill when it comes to chocolate chip cookies - grab  a bag of Nestle Toll House Semi-Sweet chips, follow the recipe on the back, end up with a deliciously chocolatey runny dough, spoon it onto a cookie sheet, and watch as your beautiful cookies flatten into pancakes buttoned with mountains of chocolate chips.

Yes, I too have entered into this ritualistic relationship with chocolate chip cookies. And no matter how much I give, the cookies always seem to morph from promising dough balls into timid crackers of sugar and chocolate.

To release yourself from this cycle of disappointment and create beautiful voluminous cookies, I recommend slight additions of sugar and flour. Specifically, use:

2 sticks butter, softened
3/4 cup packed light brown sugar
1 cup granulated sugar
2 eggs
1 Tablespoon vanilla
3 1/2 cups flour
1 teaspoon salt
1 teaspoon baking soda

Follow the usual agenda, creaming butter and sugars, adding eggs, then the dry ingredients.

Additionally, for a more full-bodied flavor (and because I'm still shunning semi-sweet chips for their unreliable recipe), I use 8 oz of milk chocolate chips and 8 oz of dark chocolate chips.


Fold your two sets of chips into the batter gently, then scoop out into 1-inch balls and bake all at 350 degrees F for 15-20 minutes.

When you pull your cookies out of the oven, you'll be happy to see plump, chewy, moist cookies rather than crispy flat pancakes.


*Dough recipe adapted from Picky Palate's Oreo Stuffed Chocolate Chip Cookies

Follow Me on Pinterest